The Ultimate Astronomy Power Bank?

I’ve recently switched to using a mini-PC to drive my portable rigs. It is Intel N100 based so it is energy efficient but it consumes more power than the equivalent ASIAIR or a Raspberry Pi running Astroberry. I like N.I.N.A. a lot and wanted a consistent imaging process so it had to be a mini-PC. With my existing 2x 20Ah power banks, sessions longer than than 5hrs were starting to give me worries. A full travel setup combines a phone, laptop, mini-PC, cooled camera, guide scope, mount and two dew heaters. And two power banks is one-too-many.

So I was on the look out for a single 12V LiFePo4 battery with enough capacity and planned to 3d-print an enclosure adding switches and sockets as required. I calculated that 50Ah was a minimum upgrade so went looking to see what was out there. I came across the DC House 100 Ah battery that included a bunch of good features built-in, a carry handle in a rugged case – almost ideal with just a few things needed to make it perfect. With the price they were offering the very small price jump from a 50Ah bare-bones battery to 100Ah with its extra features made it a no-brainer for me.

One 3D print later and this is the result:

Ultimate Astronomy Power Bank

I use a laptop, the integral USB-C port of the DC House battery easily copes with keeping it topped up if I need it. The integral 12V 5.5-2.5mm DC port can power the mini-PC directly. The integral USB A port can be used to power phones, fans and lights if required.

The 3D design is available here.

The “roof” to my DC house battery features a switchable 12V fused output (short-circuits can happen when fumbling in the dark!) via a GX16 2-pin panel connector, and a spare fuse holder. It also incorporates a switchable WIFI hotspot.

You need a laptop or some other device to control N.I.N.A on the mini-PC and connecting the two devices by WIFI makes sense. When I operate the power bank near my home the hotspot will also connect to my home WIFI for the internet. When I operate it away from the house my phone provides the internet service. The laptop and mini PC still connect to the hotspot so I do not need to change anything in their setup and the power bank can keep the phone fully charged all night via its USB A or USB C connector.

The roof’s 12V output is fused for 10A. You can fit bigger fuses if you need it, the switches I chose are 20A rated, more than enough for my rigs. It also allows me to plug in a 10A charger when back at home. I like the GX connector – it is deep enough for a secure and waterproof connection that won’t work loose and I can screw the connector down for added security.

I have since discovered that when charging @10A the GX connector gets warm, checking its specification on various websites I see the overall connector is rated @ 20A but the rating is 5-7A per pin. If you are at all concerned you could change out the connector for a 4-pin version and use two pins per wire.

I’m standardising my equipment to use GX connectors for DC from the power supplies. Even for my CEM70 and big Newtonian setup so that they can use the same power bank if necessary.

The power bank will connect directly to my astro-gear but I am designing a power distribution unit that incorporates computer control, switchable DC outputs with PWM optionally for fans and dew heater control. There are “low” cost options off the shelf but for all the features I want they are a few hundred pounds more than I am will to spend.

Posted in Astronomy Gear, Astronomy-DIY, Equipment, Projects | Tagged , , | Comments Off on The Ultimate Astronomy Power Bank?

The Horse Head Nebula (Barnard 33) and Flame Nebula

This is just part of the fascinating region of space in the constellation of Orion. I’ve stretched the image just enough to hint at the surrounding dust but in the forefront we have amazing reflection, emission and dark nebula all illuminated by the hot stars in the region. The bright star on the left in this image is Alnitak, the left-most star of Orion’s belt. The famous horse head is a dark region of dust that obscures the red Ha emission-nebula behind it.

This image was taken with my Touptek IMX533C camera and is the result of just 200 minutes of integration time. I have processed to keep the colours naturalistic. Imaged with my 70mm APO refractor, the only filter was a 2″ UV/IR. The stars in this area are notoriously bright and tricky to process, I think I did ok.

Imaged on 19/02/2025

Posted in Deep Sky, Nebula | Tagged , , | Comments Off on The Horse Head Nebula (Barnard 33) and Flame Nebula

M42 the Great Orion Nebula and Running Man Nebula

The Great Orion Nebula M42 and  the Running man nebula.
The Great Orion Nebula M42 and the Running man nebula.

This is probably the first object I ever looked at in the night sky and it is something I have always wanted to image in detail. Unfortunately it isn’t possible to see it from my observatory but my neighbour has recently trimmed some trees back giving a small gap of about 3hrs imaging if I move me gear to behind the shed. Ideal for a portable rig.

M42 a large object in a rich field of dust so wide-field imaging is best. This was first-light with my new Staradventurer GTi mount. Stripping down the Altair Astro 70 EDT-F to its lightest configuration gives me an imaging payload of 4.1kg. The Staradventurer GTi is rated for 5kg so a good margin. I was surprised how good tracking was, well below the resolution of the image.

Imaging: 70mm Altair Astro EDT-F, 0.8 FF/FR, Touptek IMX533 colour camera and a 2″IR/UV filter. Guiding with a 30mm guide and ASI120mm. Integration time around 3 hrs. Imaged: 02/01/2024

I shall probably reprocess this image to make more core detail visible, I was pretty conservative in my approach. I don’t like it too saturated or over sharp. I’m just getting used to the Pixinsight Generalized Hyperbolic Stretch process – I think there is more detail to reveal.

The last time I imaged it was in 2010 with my Canon 550d and lens. I don’t think it was a bad attempt given my skill at the time and the lens I was using:

Picture saved with settings embedded.
Posted in Deep Sky, Nebula, Uncategorized | Tagged , , | Comments Off on M42 the Great Orion Nebula and Running Man Nebula

The Pacman Nebula NGC 281, SH 2-184

The Pacman Nebula is a bright Ha and O3 emission nebula in Cassiopeia. The image below was captured over three nights in August.

For this image I used the Svbony SV220 dual band filter with the Touptek AR533C. Integration time was about 12hrs (148 x 300s). The OTA and mount were my 70mm EDT-F and HEQ5pro.

I processed the stars separately from the nebula before recombining them. Star colours are little off but more natural than unprocessed or pure white. I used the Pixinsight SCNR tool on the normal and inverted image to remove green and purple tints leaving just reddish and bluish stars.

The whole nebula is strongly Ha emitting but by exaggerating other wavelengths we can show the presence of O3 nebula. To do this the image was processed using an SHO script and various colour masks were used to highlight mainly Ha (Golden) areas and with blue areas indicating Oxygen 3 too. Generalised Hyperbolic stretch was used to exaggerate the light cloud structure and lowlight the darker regions.

Posted in Deep Sky, Nebula | Comments Off on The Pacman Nebula NGC 281, SH 2-184

Touptek 54mm 2″ filter draw – initial review.

There is no information about this filter draw on Touptek’s website although I did find a reseller with basic outer dimensions and an installation video by Touptek! – none of it linked to by Touptek’s own website. That being said, here is my first impression.

The filter draw is well packaged, it is supplied with the 6x m2.5 crosshead screws needed for attaching it to the front plate of Touptek’s and ZWO’s newest cameras. Bundled loose outside the box was a screw driver which is a nice touch.

Fitting the filter draw is very simple, decide which way you want it oriented and screw in to place:

(The dust is mine!)

The filter draw holder is accurately machined to 20mm depth, my vernier calliper showed a remarkable 20.00mm!

As my setup uses M42 and M48 threads I needed to purchase an M54M to M48F 0mm adapter. I had hoped to use the M42 16.5mm spacer provided with my Touptek and ZWO cameras but their outer diameter is too small to lock in to place on the filter draw flange so I cobbled together a series of M42 5mm spacers and shims to get the 17.8 mm I think I need to give me the 55.3mm back focus for my coma-correctors with a filter fitted.

The draw seems very will made, the three magnets give a firm clunk lock. The draw will fit either way in the holder so you can flip the filter spacing to the camera. This is either a blessing or a curse as that might muck up your flats if you are switching filters in an imaging session and don’t place then consistently the same way in the holder.

The filter draw internal dimension is about 9.8mm, the filter holder is 3.8mm therefore filters must be 6mm or thinner. My generic UV/IR filer is 7mm thick and wont allow me to slide the draw in. Temporarily, I’ve fitted the draw and then screwed in the filter from the front – not ideal!

I plan to use an UV/IR filter and a Dual Band filter with my ATR533C so now I am on the look out for thin-enough filters!

In Summary:

I am happy I chose this filter draw. The cost is very good compared to other manufactures and it is a very well made filter draw that I am sure will work well for me when I get compatible filters. But Touptek let themselves down with the lack of documentation. It fits recent Touptek cameras but there is nothing on the website about compatibility with them and older models. Its actually difficult to find this filter draw on the website – it isn’t where you would expect it to be, in the the accessories section.

Posted in Astronomy Gear, Equipment | Comments Off on Touptek 54mm 2″ filter draw – initial review.

Touptek ATR533C – IMX533 Cooled DSO Colour Camera. An Un-Boxing and First Light

(Updated with first light results 06/08/24))

Touptek cameras are very good performers and they seem to get rebranded by almost everyone. They are also priced very competitively, particularly if you buy direct.

Finding out what you get in the box if you buy a camera from Touptek can be tricky so I decided to document what I received.

In 2024 the ATR3CMOS09000KPA ,as it is also known, bought direct from Touptek comes in a box well protected with foam packing.

As well as the camera, in the box you will find:

  • 12v 3A power supply and AC power cord
  • USB3 1.5m cable
  • 2″ to m42 adapter
  • 1.25″ m42 adapter
  • M42M-M42F 21mm spacer
  • M42M-M48F 16.5mm spacer
  • M48M-M42F 0mm adapter

The camera is fitted with a front plate which seem standard across Touptek’s recent range of cooled cameras, it provides 17.5mm back focus to the sensor and is threaded for M42. The plate also has 6 x m2.5 threaded holes (5mm deep) for mounting the 54mm threaded 2″ filter draw or (ZWO??) compatible filter wheel.

If you want to connect the camera directly to your scope then the 2″ and 1.25″ adapters will work for you. The 1.25″ adapter will allow you to thread a filter on its nose. The 2″ adapter is lightly threaded for 2″ filters but from my testing it isn’t a great solution as they only just thread on. I would worry about removing the filter if I over tightened it.

The other adapters (16.5+21mm) combined will give you the correct spacing for 55mm back focus that is needed for most coma-correctors.

The overall feel of the camera is quality and precision, no sharp edges or rough machining, it is very well put together.

The rear of the camera features a Touptek standard plate:

There is space for 4 LEDs to be fitted but the fourth one is missing (not required on this model) so it is blanked off with a sticker. I found this an low-tech solution a bit surprising on an otherwise very polished product. I guess it saves a design skew and stops questions from the customers about an LED that never lights up.

I downloaded the Touptek software (Toupsky) that includes the native drivers for the camera to confirm the camera is working. I’m happy to say it all worked first time and I quickly got the camera cooled, a dark frame image captured and a histogram displayed. I can report the sensor looks clean and the cooler works well to supress noise and hot pixels.

Overall I’m very happy with first impressions. I’ve not done any imaging yet but I plan to use it with Asrtoberry (INDI) for my portable setup and N.I.N.A. for my observatory.

(Update)

I’ve abandoned Astroberry for now and have been using a mini-PC running Windows 11 and N.I.N.A. The clouds have not been very helpful but over 3 nights but I managed about 3.5 hours of imaging under very variable conditions. So here is Messier 27 as my first-light :

  • Camera: Touptek ATR533C
  • OTA: Altair Astro 70mm ED F + 0.8FR
  • Mount: HEQ5 Pro
  • 43x300s integration.

Posted in Astronomy Gear, Equipment | Comments Off on Touptek ATR533C – IMX533 Cooled DSO Colour Camera. An Un-Boxing and First Light

M101 Supernova SN2023ixf

In May of 2023 a new supernova was reported in galaxy M101. M101 is easy to image from my house and is big enough in the sky that a lot of detail can be resolved. Supernovas often appear brighter than the the galaxy they reside in and this one was reported to be very bright indeed.

I quickly got my gear in place and over 3 nights (26th-28th of May) grabbed enough sub-frames to make a decent image. Unfortunately there was a lot of misty high cloud and light pollution so contrast wasn’t the best, but I am happy with the detail I pulled out.

The above image shows the stack of all luminance frames before any stretching. I have circled the “new star” (click it to see the big picture and the supernova).

Above is the same luminance only image with just basic stretching to reveal many stars and the galaxy. Below is my final image combining L, R,G,B and Ha:

And zooming in:

Posted in Deep Sky, Galaxies | Tagged , , , | Comments Off on M101 Supernova SN2023ixf

Society and “truth”, Peter and Pete – a sad reflection

A screen shot of comments made by Peter & Pete on Youtube showing that they don’t care what is true, they only care about their own world view.

It is sad that some in society are now unable to distinguish between scientific truth and opinion. In my opinion this shows the inadequacy of our education systems to arm them with critical thinking skills.

Perhaps its only fair to state what I think a scientific “truth” is. In my opinion it is a statement that fits the observed facts it is describing and it can be tested in multiple ways to the limits of societies ability and knowledge. There is a wider definition and discussion summarised nicely here: https://en.wikipedia.org/wiki/Truth

When things can only be partially tested then those ideas are not truths they are still in the realms of theory but they are still miles ahead of an “opinion”. Scientific truths are essentially things that fit the facts as best we know. Theories are models of reality that fit the facts we are able to check at the time but may not survive without modification when we learn more in the future. A lot of theories have become accepted as fact in this way.

The trouble with “truths” is that there are so many that no one person can test them all so we are asked to trust people who are supposed to know more on the subject than we do. We choose thought leaders to listen to, some are imposed (e.g. teachers). There have always been people who abuse this trust to spin falsehoods, using personality and power to convince people less able/knowledgeable of lies.

Trump is a horrifying example of this, antivaxxers are another. Trump visibly succeeding in what he does is has impact wider than just politics, its breeds greater distrust in the nature of truth in all aspects of life. With his use of “alternative facts” he says lies are ok and you can even get away with it. In my view, by lieing so easily and with such conviction he has singularly accelerated societies distrust in all our institutions whether it be politics, medicine or science. This growing fear/distrust leads to sad outcomes such as Peter & Pete.

Posted in Random Stuff | Tagged | Comments Off on Society and “truth”, Peter and Pete – a sad reflection

The Whale and the Hockey Stick

This is NGC 4631 and NGC 4656-7 better known as the Whale and Hockey stick galaxies. Imaged over several nights 21-25th April 2022, I managed only a few hours total due to bad weather.

Posted in Deep Sky, Galaxies | Tagged , , , | Comments Off on The Whale and the Hockey Stick

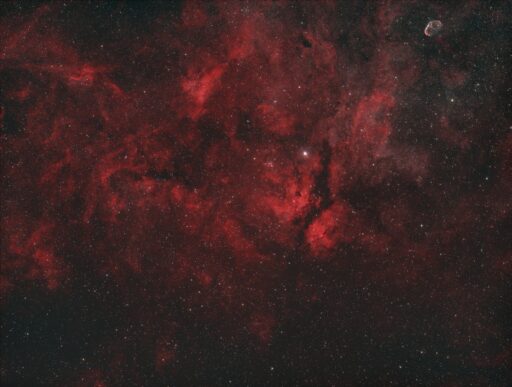
The Sadr region – first light for my Samyang 135mm F2 lens and home brew mount.

This is a “first light” image taken with my new wide-field setup.

Sadr region in Cygnus
Wide filed shot using the Samyang 135mm F2 lens and ASI1600mm Pro

Here we have the star Sadr in the constellation of Cygnus. Using narrowband Ha (56mins) and Oiii (30mins) filters I’ve captured the glowing dust in the region surrounding the star. Not bad for a first image. This widefield shot shows Sadr in the middle surrounded by nebula (IC 1318) but also included is the so-called propeller (top-left), many dark regions, NGC 6914 a blue reflection nebula (very faint, middle left region) and the Crescent nebula (NGC 6888, top right).

This lens is fantastic for grabbing photons quickly from a very wide field of view. I plan many more sessions with it and will probably revisit this area when we have astronomical dark back in August.

I’ve owned the 135mm for over 2 yrs but just didn’t have the time to put together a rig for it. I’ll make a separate blog entry on the construction of the mount.

Posted in Deep Sky, Nebula | Tagged , , , | Comments Off on The Sadr region – first light for my Samyang 135mm F2 lens and home brew mount.